Putting my minimal rock knowledge aside, this article is truly about a very straightforward DIY project I recently completed. For this endeavor, I teamed up with Canon USA. I used my PIXMA TS8120 to print my designs onto vinyl, and I’m amazed by how vibrant and rich the colors appear. There’s no digital manipulation here—it’s a fantastic home printer for both color and black-and-white tasks. I rely on this printer for many purposes, from printing vacation pictures for my albums (I’ll be printing Disneyland photos this weekend!) to scanning work documents. However, what I value most is the convenience of having a quality home printer, allowing me to whip up projects like this on a whim. I dislike waiting for mail deliveries or having to pick up prints elsewhere. Later in this post, I’ll reveal how I created the vinyl decals for this lamp, but here’s a sneak peek: I designed and printed everything from my phone. How simple is that?
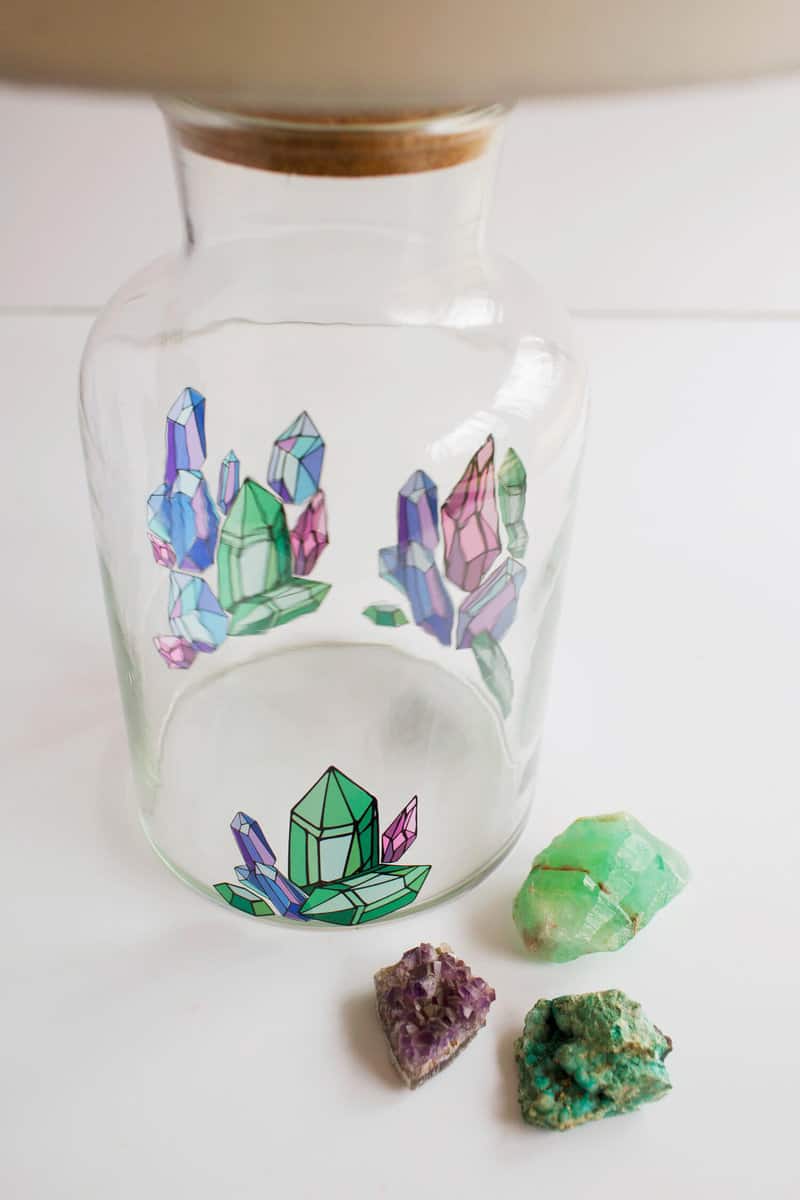
As you can observe, I applied vinyl decals to both the interior and exterior of this glass lamp base. I’ll include some photos of the lamp in my office at the end of this post, where you’ll also notice I placed a few crystals inside the lamp. Empty glass lamps like this are quite common, so finding one should be easy (mine came from Home Goods, if you’re curious). However, you can just as easily add vinyl decals to any glass or ceramic lamp—it doesn’t need to be clear or hollow like this one. I particularly enjoy using printed vinyl for specific projects, not only because the final look is sleek and polished, but also because it can be removed later without leaving sticky residue, unlike some other stickers. I don’t plan to take these off anytime soon, but I might in the future if I decide to update the lamp’s style and move it to a different room.
Additionally, if you’re as fond of printed vinyl projects as I am, be sure to check out this DIY Dress Your Tech post and this DIY Shower Curtain project I shared a while back. The shower curtain is still in our guest bathroom and holds up wonderfully!
Supplies: -inkjet printer, mine is the PIXMA TS8120 -inkjet vinyl paper -glass or ceramic lamp -scissors
Step One: Decide on the design you want for your lamp. You can print nearly anything—photos, scanned versions of your own paintings, artwork created in Illustrator or other design programs, etc. I think photos would look adorable, but I was aiming for something with crystals and a more illustrated feel. The only challenge is that I’m not a skilled illustrator (and my handwriting is awful).
So, I used a few crystal ‘stickers’ from the Spirit pack in our app, A Design Kit. I started with a blank background and added the stickers, resizing them as needed for different sizes (which I did). This was incredibly easy and a perfect solution for someone like me who isn’t an illustrator. You could also use the app to create text designs, like a quote or motivational phrase (that might sound cheesy, but you get the idea, right?).
Step Three: Cut out the vinyl decals and apply them to your lamp. That’s it! I told you this project is simple.
Here’s the finished lamp sitting on my desk, right next to my computer. I love how it turned out! Thanks for letting me share. xo. Emma
Credits // Author and Photography: Emma Chapman. Photos edited with the ACS Desktop actions.
abeautifulmess.com