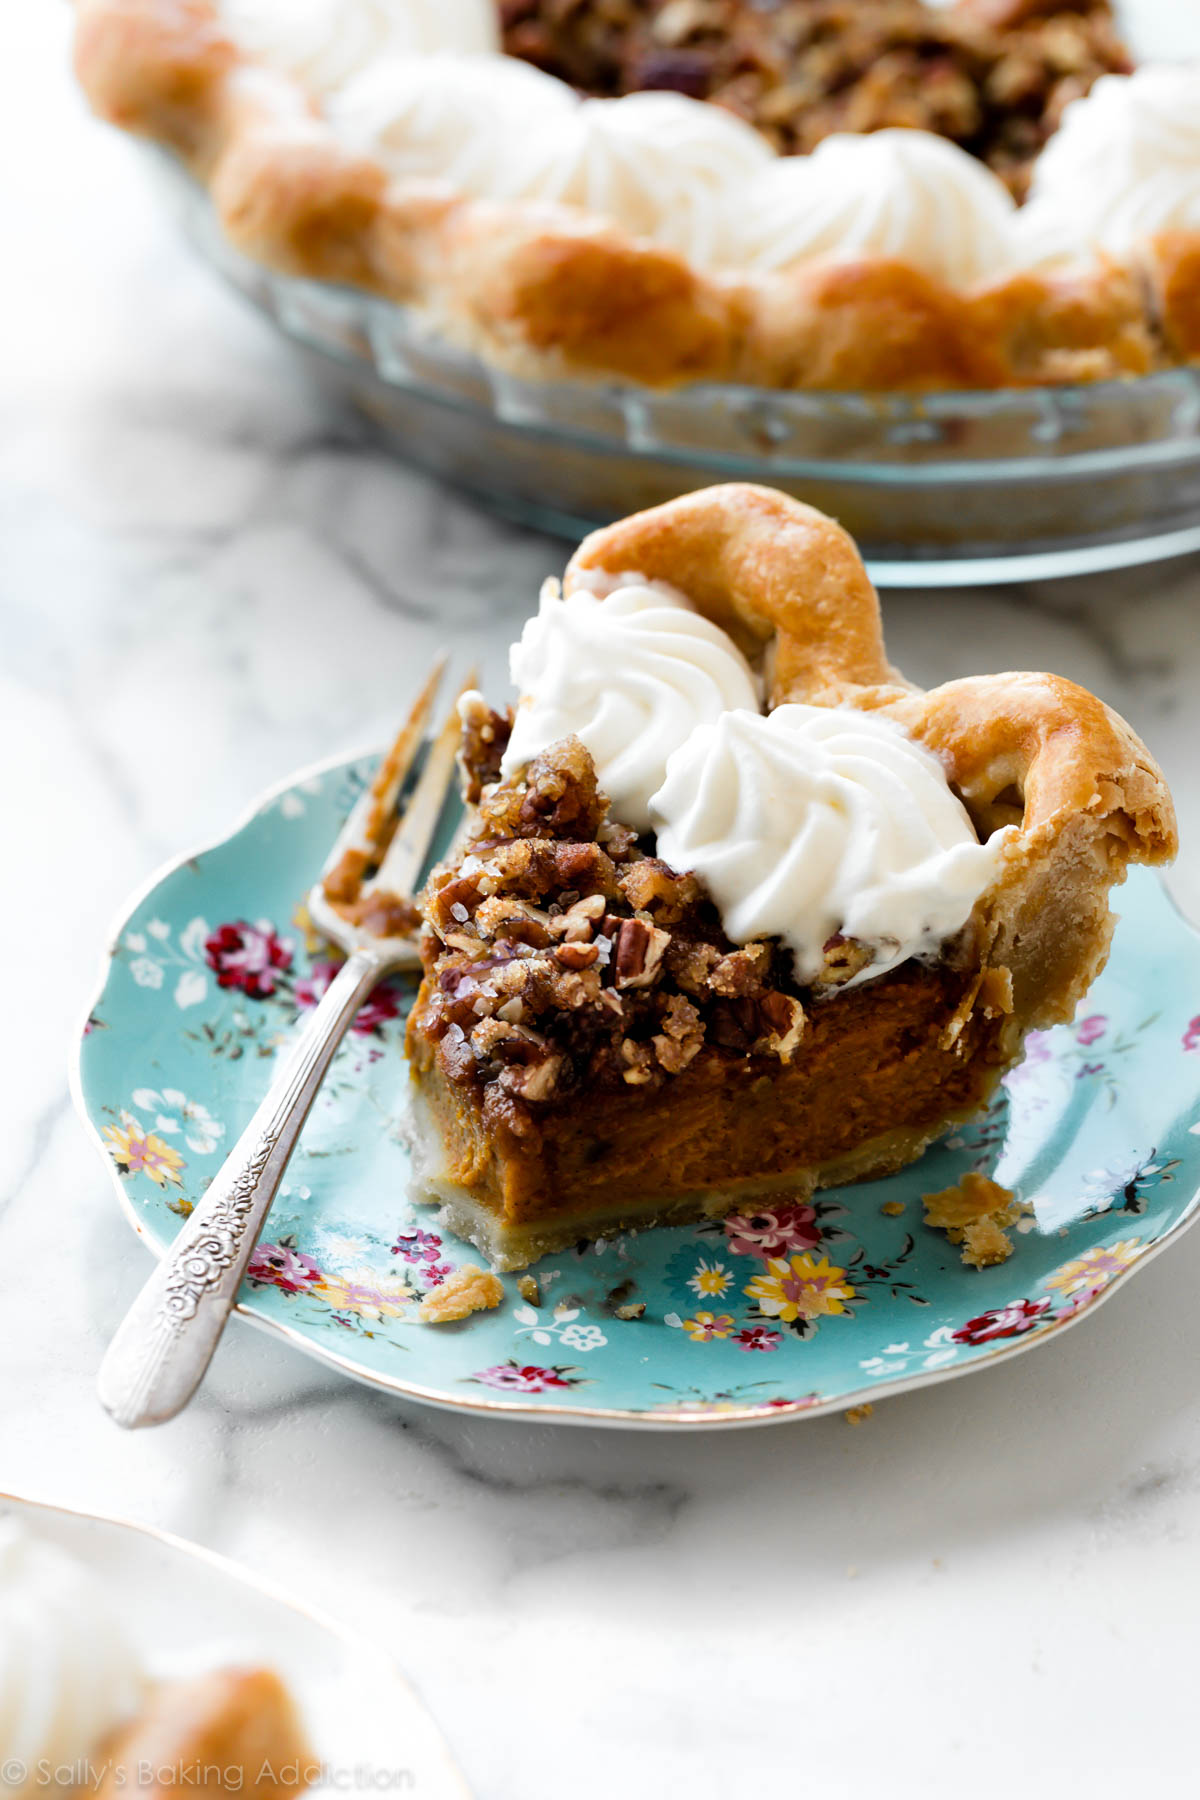
This freezer-friendly, make-ahead pecan praline pumpkin pie brings together my go-to flaky pie crust, a velvety spiced pumpkin filling, and a sweet-and-salty pecan crunch on top. Imagine salted pecan pie fused with classic pumpkin pie—pure heaven! My video tutorial guides you through every stage.
Hello and welcome to the November Baking Challenge—kicking off Day 1 of my 4th annual Pie Week! The week officially starts Monday, but I'm getting a head start with this beauty. 🙂
When it comes to Thanksgiving sweets, pumpkin pie reigns supreme. This pecan praline version offers a playful spin on my classic pumpkin pie recipe. I wouldn't dare call it an "upgrade"—perfection can't be improved—but that crisp praline layer creates a delightful contrast against the silky spiced filling beneath. Anyone who craves extra crunch in their pie will fall in love with this creation.
Three Components of Pecan Praline Pumpkin Pie
- Pie shell
- Pumpkin pie custard
- Pecan praline crown
For the perfect finish, I suggest crowning this pecan pumpkin pie with billowy whipped cream and a pinch of flaky sea salt. The salty crunch balances the praline's sugary richness, and whipped cream is an absolute must with any pie. We agree, right?
Praline Pumpkin Pie Walkthrough Video
Partially Pre-Bake the Pie Shell
Much like my classic pumpkin pie recipe, this version calls for partially blind-baking the crust—essentially giving it a head start in the oven before the filling goes in. Familiar with blind baking? Let's walk through it:
- Prepare pie dough in advance, then chill or freeze until you're set to assemble the pie. The dough must rest in the fridge for a minimum of 2 hours before rolling. You can rely on my favorite pie crust or my all-butter pie crust recipe. I gravitate toward the shortening-and-butter combo because shortening guarantees that coveted flaky bite. If desired, swap in a graham cracker crust or gingersnap crust instead. See the recipe note.
- Roll the dough into a round, then nestle it into a 9-inch pie plate. Crimp or flute the rim. My secret to picture-perfect edges—leave the extra dough in place. See step 2 in the recipe that follows.
- Refrigerate the shaped crust for at least 30 minutes. This wards off shrinking. Remember: cold dough hitting a hot oven is the goal.
- Add pie weights. As the crust bakes, its fat renders out. That melting fat pulls the dough down the pie plate's sides. Weighing it down with pie weights keeps the shape intact. Line the dough with parchment paper first, then pour in pie weights or even dried beans. (Note: you'll need 2 packs of these pie weights*.) *affiliate link!
- Bake until the edges feel fairly firm, roughly 12 minutes.
- Lift out the weights, then pour in the pumpkin custard and bake.
Certain recipes, such as my coconut cream pie and banana cream pie, call for a fully blind-baked shell because the filling never sees the oven. This pecan pumpkin pie, however, only needs a partial pre-bake. (Easier, too!)
Pumpkin Custard + A Sneaky Add-In
If you've tackled my beloved pumpkin pie recipe before, you already know how irresistible this filling is! To make space for the pecan praline crown, I trimmed back a few ingredients so the filling won't spill over. We're using 2 eggs instead of 3. I also dialed back the sugar and the liquids. This recipe calls for a full can of pumpkin, which is wonderfully convenient. I kept the spice quantities unchanged, so every bite bursts with extra warmth.
On the topic of spices, I stir a tiny pinch of freshly ground black pepper into the pumpkin custard. I picked up this trick from King Arthur Flour, and pumpkin pie is never the same without it. The black pepper amplifies the pumpkin pie spice notes, and nobody ever suspects it's tucked in there. (They'll just wonder why your pie tastes so incredible!)
Remember the Egg Wash
There's no need to wait for the partially pre-baked shell to cool—you can pour the filling in while it's still warm! To keep the crust from looking dull and pale, brush the partially pre-baked shell with egg wash. Egg wash, a simple blend of egg and milk, delivers a glossy golden finish along the pie's edges.
Crust Shield: Have you ever noticed the edges of your pie crust browning way too fast? Sometimes the rim finishes baking well before the filling sets. A pie crust shield stops the over-browning in its tracks. (I link my go-to shield in the recipe notes below.) Aluminum foil works in a pinch, too. Fold a 12-inch sheet of foil in half, then cut a half-moon shape from the folded edge. Unfold to reveal a circle. Pull the baking pie from the oven, then carefully drape the foil so the center stays open and the edges are tucked under. Slide the pie back in.
We'll bake the pie nearly through before crowning it with the praline layer. Why? First, the topping would scorch during a long bake. Second, the filling might stay underdone if it's hidden beneath the topping the entire time.
Praline Crown Ingredients
While the pie bakes, whip up the 3-ingredient praline topping. You'll need:
- Chopped Pecans: This is a pecan praline topping, reminiscent of my favorite pecan pie filling. Not a pecan fan? Swap in chopped walnuts or pistachios. Or, instead of 1 cup of chopped pecans, try 1/2 cup chopped pecans paired with 1/2 cup pepitas. Yum!
- Brown Sugar: Praline is essentially cooked sugar mingled with nuts, so sugar is non-negotiable! Brown sugar is my pick, since it echoes the brown sugar nestled in the pumpkin custard.
- Honey: A sticky liquid sweetener is essential for this praline topping. The honey melts and cooks down, yielding an irresistible sticky crunch. Light corn syrup or even maple syrup can stand in for the honey when needed.
Spoon the praline topping over the pie, then slide it back into the oven for roughly 15 more minutes.
Make-Ahead & Freezing Directions for Praline Pumpkin Pie
Pecan praline pumpkin pie is a host's dream because (handily!) it requires a full cool-down before serving. I always bake pumpkin pie a day ahead, let it cool, drape it with aluminum foil, and chill it overnight. Bring it to room temperature before serving, or enjoy it chilled.
Freezing: The baked, cooled pie freezes beautifully. For freezing, I suggest baking in a disposable aluminum pie pan—the thin walls help ward off ice crystals on your pie. Let the baked pie cool completely, then wrap the entire thing—pan and all—in plastic wrap or Press & Seal, followed by a layer of aluminum foil. This is the same method I use for freezing cakes. Freeze for up to 3 months, then keep the pie wrapped and thaw in the fridge before topping with whipped cream and serving.
- You can also freeze the partially-baked pie before the praline topping goes on. To preserve the praline topping's signature crunch, this is my preferred method. Follow the recipe below through step 7, cool the pie, follow the freezing and thawing directions above, then bring the pie to room temperature. Continue with step 8 in the recipe below. That way, the praline topping is freshly baked!
Honestly, I can't decide which steals the show: the crispy sweet-salty topping, the velvety pumpkin custard, or the flaky pie shell. But who needs to choose favorites? LET'S DEVOUR IT ALL.
Take Part in Sally's Baking Challenge
Whip up the praline pumpkin pie. If this recipe doesn't speak to you, here's the November Baking Challenge alternative:
- any previous challenge recipe OR
- Pie Crust Designs – November's Baking Challenge is always about pie, so if pumpkin isn't your thing, you can bake ANY flavor pie and embellish it with a fun, imaginative pie crust design. Dive into the full Pie Crust Designs post for all my pie crust pointers and suggestions for decorative crust toppings.
Once you've baked the praline pumpkin pie or the alternative recipe, share your creation with me using any of the methods below:
- Use #sallysbakingchallenge and tag me (@sallysbakeblog) on your public Instagram or Twitter account. (Instagram messages are tricky to track, so email is better.)
- Post your recipe photo to my Facebook page or Facebook group.
- Send your recipe photo via email.
By submitting your photo, you'll be automatically entered in the $250 giveaway.
For a bonus entry, drop a review on the recipe below!
Description
This pecan praline pumpkin pie layers a flaky pie shell, a silky spiced pumpkin custard, and a sweet-salty pecan crunch. For the best results, read through the recipe notes and watch the helpful video tutorial above before you dive in.
Ingredients
Crust
Filling
- one 15oz can (about 2 cups; 450g) pumpkin puree*
- 2 large eggs
- 1 cup (200g) packed light or dark brown sugar
- 1 Tablespoon (8g) cornstarch
- 1/2 teaspoon salt
- 1 and 1/2 teaspoons ground cinnamon
- 1/2 teaspoon ground ginger*
- 1/4 teaspoon ground nutmeg*
- 1/8 teaspoon ground cloves*
- 1/8 teaspoon fresh ground black pepper
- 1/2 cup (120ml) heavy cream*
- 1/2 cup (120ml) whole milk*
Praline Topping
- 1 cup (130g) finely chopped pecans
- 1/2 cup (100g) packed light or dark brown sugar
- 2 Tablespoons (30g) honey*
- for garnish: sea salt and whipped cream
Instructions
- For the best outcome, read the recipe in full before you start.
- Pie crust: I like to confirm my pie dough is ready before I begin making pecan praline pumpkin pie. Prepare the pie dough the night before since it must chill in the fridge for a minimum of 2 hours before rolling and blind baking (next step).
- Roll out the chilled pie dough: On a floured work surface, roll out one disk of chilled dough (save the 2nd crust for another recipe!). Give the dough a quarter turn after every few rolls until you've got a 12-inch round. Carefully transfer the dough to a 9-inch pie plate. Tuck it in with your fingers, smoothing it out completely. To build a beautiful thick edge, I skip trimming the excess dough around the rim. Instead, fold the extra dough back over the edge and shape it into a nice thick border around the pie with your hands. Crimp the edges with a fork or flute them with your fingers. You can see me do this in the video tutorial above. Carefully line the pie's interior with two sheets of parchment paper or aluminum foil, as shown in the photos and video above, then pour in the pie weights. Make sure the weights are spread evenly throughout the pie plate. Chill the dough in the fridge or freezer for at least 30 minutes—this wards off shrinking. (You can actually add the pie weights before or after chilling; either way works.)
- Preheat oven to 375°F (190°C).
- Pre-bake the crust: Bake the cold pie crust (with weights!) for 12 minutes. Remove from the oven and cool for a few minutes while you prep the filling. You can pre-bake the crust up to 3 days in advance. Cover the cooled crust tightly and refrigerate until ready to fill.
- Whisk the pumpkin, eggs, brown sugar, cornstarch, salt, cinnamon, ginger, nutmeg, cloves, black pepper, cream, and milk together in a large bowl until completely combined and smooth. If you'd like, an electric mixer works for this step.
- Remove the pie weights (and parchment) from the crust. Pour the filling into the warm crust. Brush the edges with egg wash. Bake for 50-55 minutes or until the center no longer jiggles. The very center on top can still be slightly tacky, as long as it no longer jiggles when you lightly tap the pan. During baking, if the pie crust edges start browning too quickly, apply a pie crust shield or a ring of aluminum foil to protect them.
- Topping: Pull the pie from the oven and add the topping. I like to prep the topping as the pie bakes so it's ready to go. Using a fork, stir the pecans and brown sugar together. Drizzle in the honey and mix until combined. Spoon it over the pie, then very gently press it down with a spoon or fork so it adheres to the filling.
- Return the pie to the oven and bake for an additional 15 minutes. Use a pie crust shield to protect the crust from over-browning, if needed.
- Remove the pie from the oven and set it on a wire rack to cool completely, at least 3-4 hours. If not serving right away, cover the cooled pie and store at room temperature for 1 day or in the fridge for up to 2 days.
- Serve at room temperature or cold with a sprinkle of sea salt and whipped cream. I used an Ateco 849 piping tip for the whipped cream, but a spoon works fine for dolloping onto each slice.
- Cover and store leftover pie in the fridge for up to 5 days.
Notes
- Make Ahead & Freezing Instructions: See the post above for detailed make-ahead and freezing directions.
- Special Tools (affiliate links): Pastry Blender, Rolling Pin, Pie Dish, Parchment Paper, Pie Weights, Pastry Brush, Pie Crust Baking Shield
- Pie Crust: Both linked pie crust recipes yield 2 crusts. You only need 1 crust for this pie, so freeze the 2nd half for later. If using store-bought pie dough, you still need to pre-bake it. If needed, swap in a graham cracker crust or gingersnap crust instead of traditional pie crust. Pre-bake the cookie crust at 350°F (177°C) for 10 minutes. Skip the pie weights if using a cookie crust.
- Pumpkin: Canned pumpkin is best in this pumpkin pie recipe. If using fresh pumpkin puree, lightly blot it before adding to remove excess moisture. The bake time may stretch longer.
- Spices: About 1 teaspoon of pumpkin pie spice can replace the ginger, nutmeg, and cloves.
- Heavy Cream & Milk: Don't swap in a lower-fat milk—the fat in whole milk is essential. Feel free to use 1 cup of half-and-half instead of the heavy cream + whole milk combo.
- Honey: If needed, you can swap the honey in the praline topping for light corn syrup or even maple syrup.
Keywords: pumpkin, Thanksgiving, pie