Here's a little secret from the world of decorative crafting…
Absolutely it does — and I've got the evidence to back it up.
With Valentine's Day just around the corner, I'm joining the Heartfelt and Handmade Valentine Blog Hop today. I typically skip the full-blown decorating for the holiday, though I enjoy setting out a couple of doily candles and a few pink roses.
More often than not, my Valentine's attention lands on what we'll enjoy for an intimate dinner for two. 🙂
This year, Ed and I have committed to smaller portions. We haven't eliminated any food groups — we're simply cutting back on quantities of the foods we love.
Our dinner will likely consist of filet, a side of steamed vegetables, and a glass of red wine.
For dessert, cake is on the menu — but rather than baking or purchasing a whole cake that we'd inevitably finish off (which we're trying to avoid) or toss in the trash (what a shame that would be)…
Instead, I'm planning to pick up a single chocolate cake slice from our neighborhood bakery for us to share. Or, for the purpose of this post… a slice of frozen Pepperidge Farm Chocolate Cake plucked from the supermarket's freezer section. 🙂
To transform this simple dessert into something that feels truly indulgent, I wanted to give it a little extra magic — not just figuratively, but by physically lifting the cake onto a dessert-sized pedestal cake stand.
The spark for this project came from a 9″ diameter wood and marble stand I spotted at World Market. Since that particular piece is no longer in stock, I headed to my local thrift shop in search of an affordable round marble piece to craft my own version.
Working with secondhand finds from thrift runs or items tucked away in your own collection opens the door to creating virtually anything your imagination conjures up.
In last week's post, I shared my latest thrift store haul and promised to reveal what I'd done with each piece. This cheese plate came home with me for just $3.
Once home, I extracted the round marble insert from the wooden base. The process was straightforward — a putty knife did the trick to pry it loose.
And now, the moment I've been waiting for — proof that 1 + 1 = 1, with a small assist from…
… hot glue, Liquid Nails, or Glue Dots.
Attach one base to one flat round surface, and voilà — you've got yourself a pedestal stand. 🙂 1 + 1 = 1
The wooden pedestal base was a Michaels purchase.
The pedestal can be left in its natural state, painted, or stained. For mine, I used Amy Howard's, Vintage Wood Better With Age that I had tucked away in my supply stash. It is a bit of an investment. You can achieve a similar effect with this Driftwood Weathering Wood Finish or any driftwood or weathered wood stain. I diluted the stain with water to mimic a driftwood tone; using it at full strength will deliver a deeper wood finish. I rubbed white wax across the surface and into the carved grooves, then sealed everything with two light coats of satin Polycrylic.
HOWEVER… the possibilities for crafting a one-of-a-kind stand don't end with a wooden pedestal and marble top.
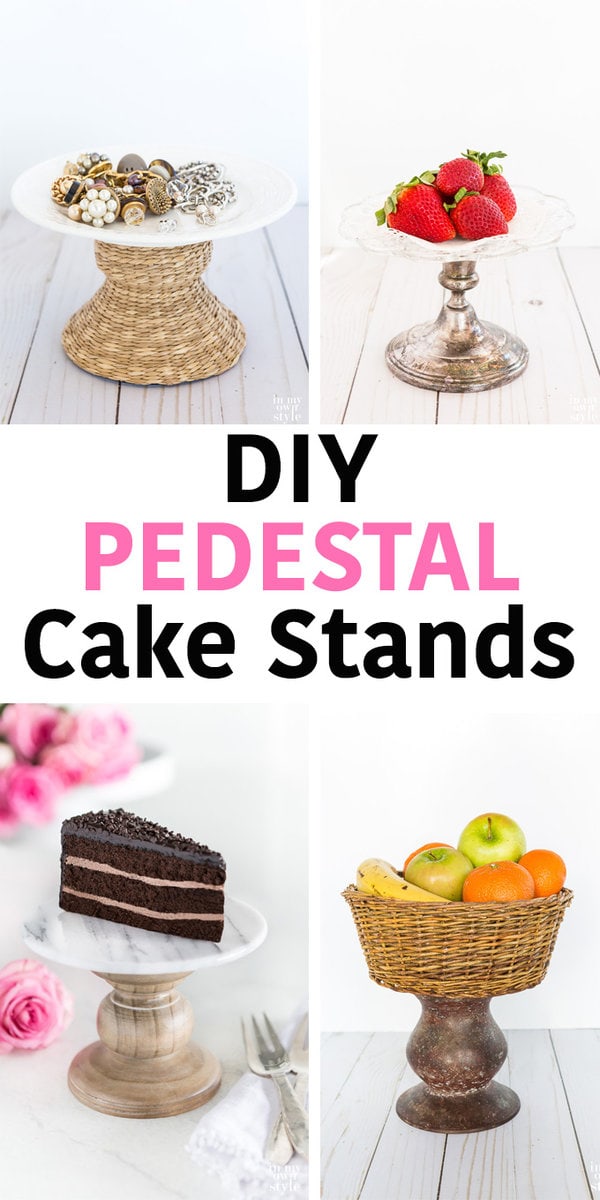
If farmhouse isn't your aesthetic, check out these alternative materials that can be combined to create pedestal stands suited to any décor preference.
For the bases, I assembled the wooden pedestal, a pillar candle holder, a damaged woven piece (another thrift find), and a silver candlestick.
For the round tops, I gathered a basket, a bowl, a selection of dessert-sized plates from my kitchen, plus the circular marble slab.
Another round of 1 + 1 = 1 in action. Hot glue secured the basket to the candle holder. For a non-permanent option, Glue Dots from the craft store work beautifully.
Vintage lovers, take note: pairing an aged silver candlestick with a glass plate creates a stunning combination. I reached for the clear formula of Liquid Nails to bond these two pieces, since the transparency of the glass would reveal any visible adhesive.
The pink and white gingham plate was a Michaels find, while the marshmallow hearts came from HomeGoods.
Hot glue secured the damaged woven base — yet another thrift store rescue…
…to a white basketweave-patterned plate, creating a stand that now corrals my jewelry on the bedroom dresser.
When joining a base to a plate or basket, flip the plate upside down first, then position the base on top. This orientation makes it easy to see and perfectly center the base on the plate.
Allow the adhesive to cure fully, then flip the stand upright — and it's ready to use.
Recall the glass dome from the disassembled cheese board? It's too large to pair with the marble round, but it sits beautifully atop a dessert-sized dinner plate.
Glass plates, wooden pedestals, candle holders, round baskets… Do you have any of these — or perhaps something entirely different — that you could repurpose into a pedestal stand tailored to your taste?
For those who'd rather skip the DIY route, here are some ready-made wood and marble pedestal stands I came across online.
World Market Round Marble and Wood Pedestal Stand
Russo Cake Stand
Footed Cake Plate Stand
This post is part of a Valentine's Blog Hop happening this week. If you're hunting for more Valentine's Day inspiration, scroll through the blog posts below — my fellow blogging friends have shared tons of inspiring projects.
A heartfelt thank-you to Jennifer from Town & Country Living for pulling us all together!
MONDAY
Town and Country Living | Finding Silver Pennies | Duke Manor Farm | Maison de Pax | Shabbyfufu
Making It in the Mountains | Tidbits | Taryn Whitaker | House by Hoff | Clean and Scentsible
TUESDAY
So Much Better with Age | The Happy Housie | Shabby Art Boutique | Paint Me Pink | VinYet Etc.
Unskinny Boppy | Sincerely Marie Designs | A Burst of Beautiful | The Wicker House | Zevy Joy
WEDNESDAY
My Uncommon Slice of Suburbia | In My Own Style | Golden Boys and Me | Seeking Lavender Lane
On Sutton Place | Happy Happy Nester | The Chronicles of Home | Craftberry Bush
I'm also sharing this post over on: Tip Me Tuesday