1 3 ounce box of strawberry jello 1 cup of water 1 cup of rosé sparkling wine 1 container of strawberries melting chocolate discs
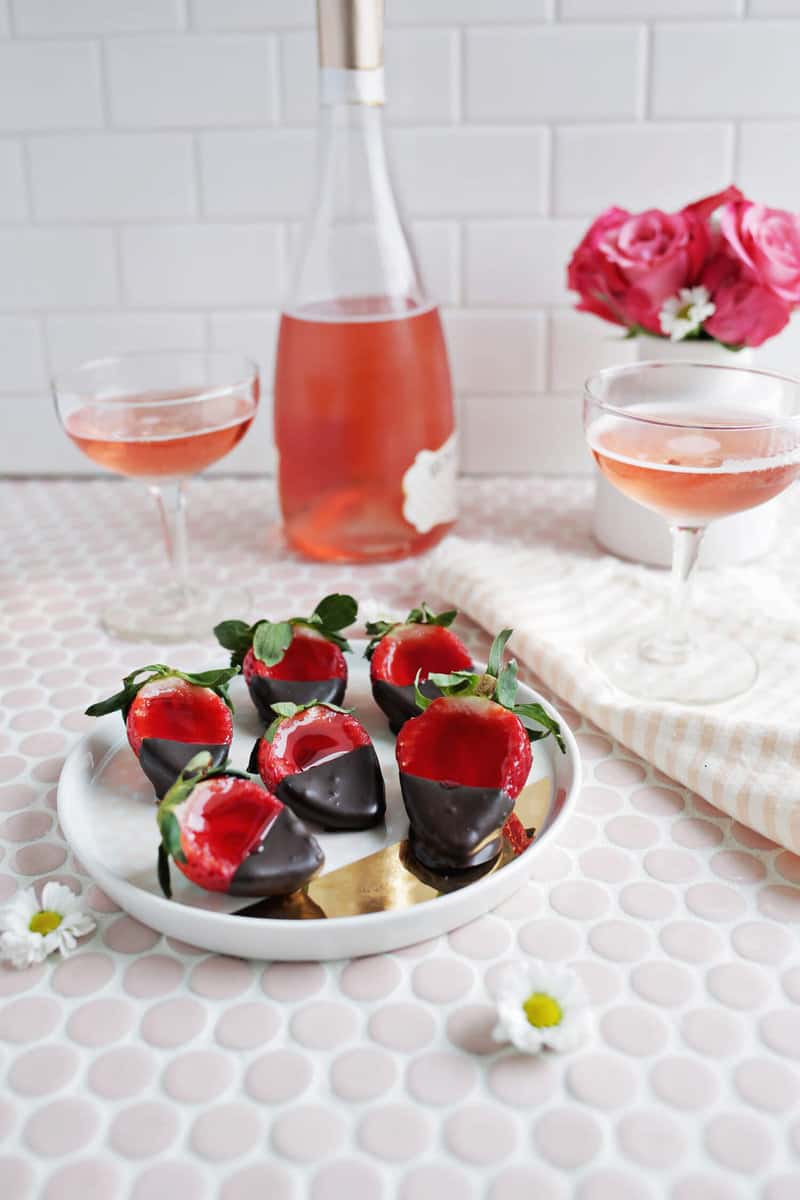
Begin by rinsing and slicing your strawberries in half. You have two options: cut them straight through the middle so each berry yields two shots, or trim off the side just below the green tops to keep more of the leafy part intact. I went with the latter and snacked on the leftover pieces as I worked—ha! Using a small spoon, hollow out the center of each strawberry half. A grapefruit spoon worked perfectly for me, so I recommend grabbing one if you don't already own it (plus, they make eating grapefruit way easier too).Pour the jello powder into a bowl while you bring one cup of water to a boil on the stove. Add the hot water to the powder and stir for a couple of minutes until fully dissolved. Pour in a cup of rosé, mix well, then transfer the liquid into a vessel with a spout for easy filling of the strawberry halves. I highly recommend placing the berries in a holder like this or this to keep them upright and catch any jello that drips through. Refrigerate the strawberries for several hours to allow the jello to set.During setting, some jello will likely seep out through the bottom of the strawberries. If you want them completely filled to the top, consider making half the jello mixture first, pouring that in and letting it set, then adding the second half on top. Once the bottom layer firms up, it should seal the base so no more leaks occur, giving you perfectly full strawberries.
After the strawberries have set, melt the chocolate discs according to the package instructions for dipping!
Dip each strawberry halfway into the melted chocolate (make sure it's not piping hot to avoid melting the jello), then place them on wax paper and return to the fridge to chill and harden the chocolate. Keep refrigerated until serving time!If you're thinking, "those look incredible!" then trust me—they taste even better than they appear! And I'm a huge fan of anything with a crisp chocolate shell, so that's an extra bonus. As you can see, these are easy to pick up and eat by hand, so no extra utensils are needed. However, like most jello shots, I'd recommend putting them out only right before you're ready to serve. Hope these delightful treats make it into a special evening soon! xo. Laura
Chocolate-Covered Strawberry Jello Shots
- 1 3 ounce box of strawberry jello
- 1 cup of water
- 1 cup of rosé sparkling wine
- 1 container of strawberries
- melting chocolate discs
- Start by washing and cutting your strawberries in half. You can either cut them right down the middle so each strawberry will make two shots, or, you can slice off the side just after all the greenery on top so you get more greenery per shot.
- Use a small spoon to scoop out the middle section of your strawberry half. I used my grapefruit spoon and it was perfect for the job, so I suggest getting one of those if you don’t have one.
- Pour your jello powder into a bowl while you boil one cup of water on the stove.
- Add the boiling water to your powder and stir for a few minutes until the powder is dissolved. Add a cup of rosé, stir, and pour your mixture into something with a spout so you can fill your strawberry halves. Place your strawberries in the fridge and allow them to set for several hours.
- You’ll mostly likely have some jello leak through out the bottom of your strawberry as it sets. So if you want your strawberries to be totally full to the top, you may even want to make half your jello, pour that in and set it, and then pour the second half on top. Once the bottom half has set, that should seal up the bottom so that no more will leak out and you’ll know you’re getting a totally full strawberry. Once your strawberries are set, you can melt the chocolate discs (follow the package directions) to dip your strawberries in!
- Dip each strawberry halfway into the chocolate (wait until the chocolate isn’t burning hot so you don’t melt the jello) and place on wax paper and then in the fridge to cool and set the chocolate. Keep in fridge until ready to serve!
Credits // Author and Photography: Laura Gummerman. Photos edited with A Color Story Desktop.